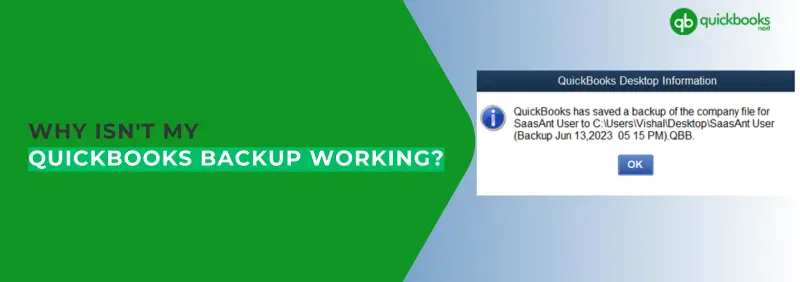
Financial management is a complex task but it becomes easy with QuickBooks. Powerful features of QuickBooks make it easy for users to maintain records as well as track expenses. But many users complain that while operating financial tasks they encounter an error “QuickBooks Backup not working”.
This error might hamper your financial records due to incorrect input. Almost 67% of total QuickBooks users face error “QuickBooks Automatic Backup Not Working” on a daily basis.
But there is not much to worry about as we are here with some easy and appropriate solutions. These can be executed by any layman QB user.
Although these are helpful in most of the cases but if there is some damaged company file in your QuickBooks, then these solutions might not resolve this error.
Let us go through this article and find ways to get rid of the error with the on screen message “QuickBooks Automatic Backup Not Working “or “QuickBooks Automatic Backup Stopped”. Follow each steps correctly, otherwise you will create an another bigger problem for you.
Possible causes for QuickBooks automatic backup not working error
It’s important for users to back up their file for safety purpose, and QuickBooks automatic backup helps you with the same. It automatically backup your files.
But sometimes it stops working, and reasons behind this could be many. If you also want to know the reason/cause, then you can look for it below:
- When the scheduled backup is not set up in a correct manner, then it might trigger the error to appear.
- In case your file’s name exceeds more than 65 characters, the error might show up.
- The automatic backup error pops up when you set a file more than 3 gigabytes.
- .Tmp file will keep on creating in the QuickBooks directory, in case you use the keep QuickBooks running for quick startups option. This feature starts the backup of the application but fails to complete it.
- Another possible reason can be operating system and QuickBooks. There are some compatibility issues.
- Sometimes operating the latest QuickBooks version on Windows Vista, or even outdated QB version on Windows 10 can trigger the error.
- The error may appear when users have an inappropriate drive or access rights. The automatic backup gets hindered in case the QuickBooks Database Server does not include complete access right.
- If users have a damaged or corrupted company file then it can also be the cause behind the error.
- When users use an older version of QuickBooks application and newer updates it on time.
- Automatic backup gets blocked when white spaces at the end of the file name are left.
Expert Recommendation: QuickBooks Data Recovery Service Desktop Windows MAC
Easy Solutions for QuickBooks Automatic Backup Not Working
QuickBooks automatic backup not working – This error occurs when you set up automatic backup inappropriately. But there is nothing to worry about, some of the solutions are easy for you to execute. You will be able to resolve the error very easily.
We tried to explain every solution in easy language so that you don’t find any difficulty in resolving the QB automatic backup not working error. Read every solution carefully.
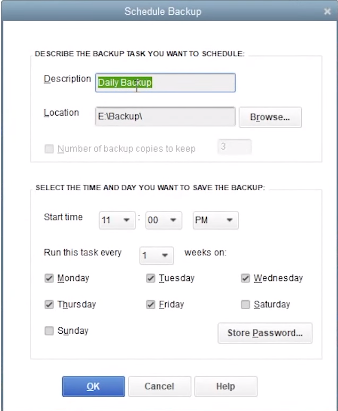
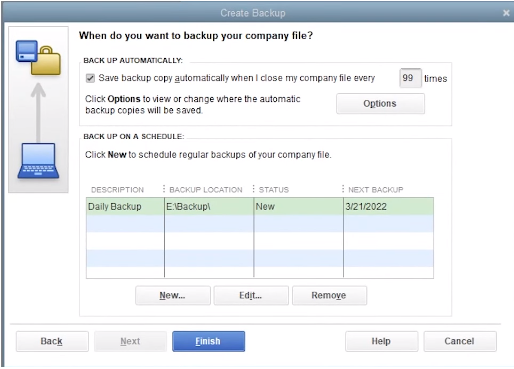
Solution No. 1:Check the setup of QuickBooks automatic backup
If you are facing issues regarding the automatic backup not working, then follow this solution, we mentioned every procedure required for the scheduling of automatic backup.
Following this procedure might resolve your problem:
- First of all, search for the file menu and click on it, now from the sub-menu choose the Backup or Save copy option.
- After that, click on the backup copy option and then left-click on the next button.
- Go to the options to set up your backup defaults, if in case your backup is not created. [Choose where you wish to store your local backup], now, tap on next.
- Now, go for the change location option, move your cursor to the next option and press enter.
- Further, go to the save option and click on it, also don’t forget to plan your future backup and then tap on Next.
- Look for the option save backup copy automatically checkbox, and checkmark the option so that whenever you close your company file it gets saved on its own.
- Finally, type the number asked in the box and tap on finish.
Solution No. 2: Rebuild the data utility and Run the verification
In case the setup is appropriate and the error still exists, then you need to run the verify data utility tool, in order to know about the errors.
If the QuickBooks automatic backup not working error shows up on the screen, then at that time you need to run the rebuild data utility tool.

Follow the steps mentioned below:
[Steps for verifying the data]
- First, go to the QuickBooks application on the desktop and click on it.
- From there, click on the file menu, from the options given below, choose the utilities option, and then from the sub-menu, select verify data.
- After that, the scanning process for your application will start, if any data corruption or problem is detected, then you will receive a message that says, “Your data has lost integrity.”
[Steps for rebuilding data utility]
- For this also go to the file menu of the QuickBooks application, and right-click on it.
- Then from the same utilities option click on the rebuild data option.
- After that, an option for backup confirmation will appear on the screen. Confirm it.
- Now, it will start the procedure of file repair and check whether any damage is present or not.
- After the process is completed, it will display a message on the screen, that says, “Rebuild has completed,” tap on close.
- Later, if you want to ensure that there is no data corruption left, you can verify the tool again.
Rebuilding the data utility or running QuickBooks in compatibility mode is quite technical task. These tasks require good experience in running QuickBooks. Even if you are very confident about your skills, then also execute these solutions very carefully. One mistake and you will lose all your company files.
Solution No. 3: Upgrade the QuickBooks application to the latest version
If the above solution didn’t work, then check your QuickBooks application, maybe the problem is in the application only. Try to upgrade QuickBooks to the most recent version.
This might resolve your QB’s automatic backup not working error, here’s how:
- To begin with, go to the QuickBooks application, and double-click on it.
- After that, click on the file menu, and from the options tap on exit.
- Now, again from the Windows, click on QuickBooks, and from there, click on the Run as Administrator option.
- Further, again from the menu bar, click on the help menu and then select the Update QuickBooks option.
- Tap on save, after choosing the mark all option.
- Then, click on the Update Now menu and checkmark the reset update option.
- After the above process, tap on the get updates option.
- You will now receive the error message that says, “Update Complete” After that make an exit from the application.
- Go to your QB desktop application, then Install Updates will show up on the screen, and choose yes.
- Once the updates are installed, you need to restart your computer.
Solution No. 4: Run the QuickBooks in Compatibility mode
Check what is the mode of your QuickBooks, if it is in compatibility mode then it is OK, but if it is some other mode then change it to compatibility mode to avoid any damage.
Below are the steps to resolve the error:
- Initially, press the Windows + R keys together from the keyboard. The run window will open.
- Type Winver in the box and then press enter.
- After that, click on the QuickBooks application, and from there tap on the properties option.
- Select the compatibility tab and checkmark the box that says, “Run this program in compatibility mode.”
- Some options will appear on the screen, select your Windows version.
- In the end, tap on apply.
Solution No. 5: Change the Windows version from OS to 10
If none of the above solutions worked for you then, try this method. Change the Windows from OS to 10.
Don’t worry if you don’t know how to do it. We tried to mention every step for you to make the work easier:
- To start with, go to the Task scheduler from Windows 10.
- Now, a dialog box will appear, and from there tap on Task Scheduler Library.
- Further, search for QuickBooks Backup task and click on it. After that, choose properties option by tapping on it.
- Go to the general section, then click on confirm for option.
- Lastly, from the options given, select Windows 10 and click on OK.
To Sum Up
Error like “QuickBooks Automatic Backup Not Working “or “QuickBooks Automatic Backup Stopped” are like a virus in your computer. These errors slowly damage all your data and corrupts your QuickBooks software as a whole.
Therefore, if you get stuck anywhere between these solutions, feel free to contact our certified QuickBooks experts.
They will provide you with perfect solution. Moreover, they will also guide you in setting up your QuickBooks in a way so that you do not face such issues again. Contact us at our Toll-Free Number +1(805) 419-9019.