Improved effectiveness and great results are universal goals, and this aspiration extends to users of QuickBooks Desktop. Many individuals want to upgrade QuickBooks Enterprise from Pro or Premier for a better experience and features.
The primary drivers behind this decision often revolve around the core features and advanced inventory that are entirely to the Enterprise solutions. This draws attention to the particular functionalities built into enterprise solutions that strongly encourage users to upgrade.
If you’re already using Advanced Inventory in QuickBooks Enterprise and want to temporarily switch it off, be sure to check out this informative and quick guide on QuickBooks Enterprise: How to Turn off Advanced Inventory
If you also use QuickBooks Pro or Premier, then it is time to upgrade to QuickBooks Enterprise to experience more benefits. In this article, we will be discussing the need to upgrade, how to upgrade, etc.
What is the requirement to upgrade QuickBooks Enterprise from Pro or Premier?
Upgrading everything from time to time is very important for more advanced technology, to experience new features, updating QuickBooks is also necessary to ignore errors and unlock new features.
We have discussed in detail the reason why we upgrade QuickBooks, read it thoroughly to know the advantages:
| Feature | QuickBooks Pro | QuickBooks Enterprise |
| User Capacity | 3 to 5 users | 30 to 40 users |
| Server Setup | Limited user capacity for a single system | Multiple users interlinked to the same Windows server |
| Upgrades | Manual upgrades | Automatic updates with active subscription |
| Class Assignment in Transactions | No manual class assignment | Allows assigning a class to name, item, or account manually |
| Company File Size Handling | Limited file size | Handles large company file sizes |
| Backup Accessibility | Limited | Easy and accessible backups |
| License Expansion | Limited license scalability | Allows purchasing more licenses as business grows |
| Search for Items in Transactions | No ability to search within transactions | Allows searching for items within transactions |
Steps to upgrade QuickBooks Enterprise from Pro or Premier
The process of upgrading QuickBooks Enterprise from pro or premier includes all like preparation, downloading, conversion, backup, and registration.
This can be a time-consuming process, but you don’t need to worry, just proceed with the steps mentioned below and you will be done in no time.
Step No. 1: Prepare and verify the network
When you Upgrade QB Enterprise to Pro or Premier, it is very important to take into account three major factors: Networking, File sharing, and permissions.
A. Make sure you have the proper team
- For the upgrade, you will need an appropriate system or network admin who has the knowledge and expertise of networking, and file sharing and also has permissions for the installation and configuration of the QuickBooks Enterprise.
- You will also need a financial expert who has a proper understanding of the company’s financial requirements and who knows how to establish the company file accurately.
B. To set the network choose the correct option
- Central Server Option: This option, includes QB Database Server Manager, which already has a central server installed in it.
- Remote desktop service option: For this option, you need to install QB Enterprise on a high-powered central server. The server should have the ability to store the company file. In this, the workstations do not have Enterprise installed in them.
- Peer-to-peer option: This option requires 2 workstations, one that can store the company file and the other that can access it through the network.
Note: As another option, you can store the company files in the Linux Server and use Enterprise on the Windows desktop client and have access to the data.
C. Check the network bandwidth
If you want to use the application in multi-user mode then you need to check the network bandwidth. To see whether the network connectivity is quick or not try running the enterprise.
If you don’t know how to do it, then follow the steps mentioned below:
- To begin with, you need to select a file that is large to test the speed.
- After that, remember the tested file size in megabytes.
- Now, go to the network location and copy the test file to the system. You don’t need to copy the time it took to copy.
- Further, perform the calculations (file size x 8/ copy time) to check the network bandwidth.
- Here, examine the antivirus exclusions and the firewall settings.
- Lastly, go through the system requirements.
Step No. 2: Install QuickBooks Desktop Enterprise
In this step, you need to install Enterprise of the same version on your systems. Subsequently, install the QuickBooks Desktop Enterprise application on the server.
- First of all, you need to close each program running in the background. Also, close any antivirus program.
- After that, click on the file you have downloaded.
Note: You can also install from the optional backup CD, in case you have ordered.
- Now, some instructions will appear on the screen, you need to follow them until the windows for selecting installation type pop up.
- Some options will show up in front of you, opt for the one you want to install. Click on express, so that the installer makes the right selection on its own.
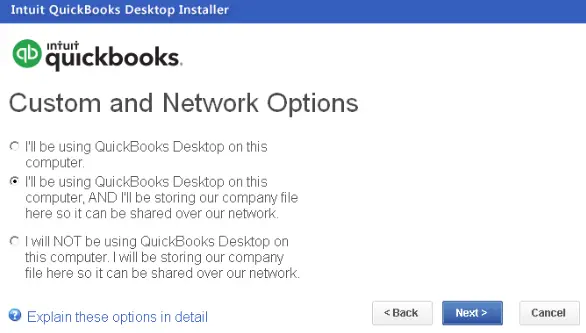
- Further, for preferred installation and location, choose the custom and network options.
- After the above procedure, a few options will come up. You need to click on one for how QB will be installed.

Options are as follows:
- I will use QuickBooks on this computer, but the company file will be located on some other computer.
- I will use QuickBooks on this computer and also store the company file here for easy sharing over our network.
- I will not use QuickBooks on this computer, but store the company file on it for the motive of sharing the company file over our network.
- Now that you have selected any one option as per your requirement, follow the instructions shown on the screen.
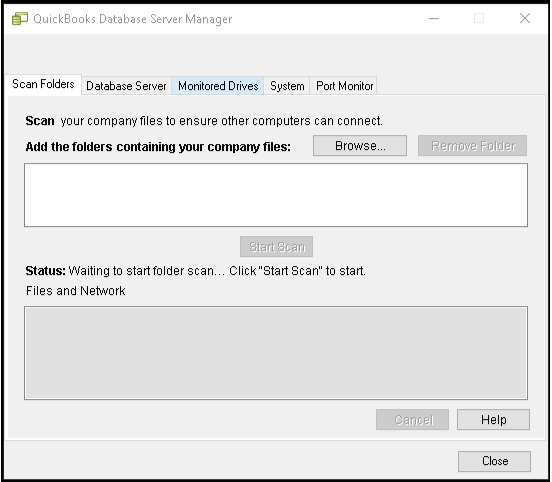
- Finish the installation procedure, and then launch and configure QB Database Server Manager.
Note: We would suggest you go for Linux Database Server Manager for the installation of QuickBooks Enterprise Manager if in case you are a Linux user.
A. The database server manager configuration
You can skip this step if you are a workstation user. The procedure must be executed entirely on the computer where you have thought of storing the QuickBooks Desktop Enterprise company file.
You need to mandatorily configure the Database Server Manager, but for that, you need to take some measures, which are as follows:
- First, go to the Windows icon and open the start button.
- Then, click on the programs option, and choose QuickBooks.
- After that, tap on the Database Server Manager option to open it.
B. Perform the scanning of the company files

- You need to give access to company files to other QuickBooks users by scanning them all.
- Now, from the configuring database server manager window, click on the scan folder option.
- After that, you need to browse the server by clicking on the add folder.
- Further, select folders that have company files in them.
- Finally, click on the start scan option to proceed with the scanning procedure.
C. Hard Drive needs monitoring
- Initially, click on the monitored drives option.
- After that, select all the local drives you wish to monitor.
Step No. 3: Migrate the data to enterprise from pro
- To start with, go to the file menu, and from there click on Create Backup.
- Choose a secured location to store the file. We would recommend you store it on some separate system or server.
- Now, launch QB Enterprise and then click on the company data file.
- After that, type the admin password in the given box.
- Further, click on the checkbox on the screen, and then tap on Update now.
- Once you are done with the above procedure, click on OK.
- Now some instructions will show up on the screen, follow them carefully.
- Lastly, choose yes.
Step No. 4: Configure the settings of the Network and Server
A. Configuring user’s permissions and lists
The list will be transferred to the Enterprise application as it is but it does not have similar limits. Unlike QB Pro, there aren’t any limits in the QuickBooks Enterprise version. You can change the permissions every time you want.
B. Register QB Desktop Enterprise
You can enjoy all the advantages by registering. Just follow the steps mentioned below:
- First, start QuickBooks Enterprise.
- After that, click on the help menu and choose Register QuickBooks from there.
- In the end, tap on the begin registration option and follow all the instructions.
To sum up!
This brings us to the conclusion of the process. We hope that you were able to upgrade QuickBooks Enterprise from Pro or Premier and that it was beneficial for you. If you encounter any challenges or errors, don’t hesitate to contact us at our toll-free number 1(805)-419-9019.
Our dedicated team of QuickBooks professionals and experts are available 24/7 to guide you through the application upgrade effortlessly.
