Are you looking how to add payment link to QuickBooks Desktop invoice? Then you are at the right place. We will help you find the payment links and how to add them to the QB invoice quickly.
With the help of this article, we will discuss the functionality of how to add payment link to QuickBooks Desktop. If you want to clear all your doubts regarding it, then follow the article till the end. By the end of this article, you will have a much better understanding of payment links.
What Do You Mean by Payment Links in QuickBooks?
Payment link in QuickBooks Desktop is a feature that permits users to add a direct link to payment options in their invoices. If you don’t want to manually process payments or depend on traditional methods like checks, then you can create invoices with added payment links.
This type of links allows customers to easily make online payments. It improves the overall experience in financial transactions. This feature was created to make the payment work smoother for users and accelerate the payment collection process for business owners via QuickBooks.
The Advantages of Add Payment Link To QuickBooks Desktop Invoice
There are some befits that you will experience in you utilize payment links. Those are as follows:
- This accepts online payments via invoice.
- This allows the customers to pay digitally.
- This also helps to set recurring invoices to be automatically sent and paid.
- Through this, you can take contactless, in-person payments via mobile app and card reader.
How To Add Payment Links to QuickBooks Desktop Invoice?
Adding a payment link to QuickBooks Desktop invoice is a very uncomplicated process. Just follow the steps carefully mentioned below:
- First of all, you need to tap on Invoice.
- After that, you need to choose the Customer that is already added or you can Add a New Customer.
- Now, add every information linked with the product or services that you want to sell and mention the price too.
- Then, be mindful of the fact that during the execution of the steps, your online payment option should be enabled. Also, tap on the Save and Send option.
- After the above procedure, QuickBooks will bring up a preview of the invoice on the screen. In this preview, you are required to select a payment method, for example, credit card or bank transfer.
- Further, when you are done with the above procedure, you need to click on Send and close to send the invoice through email.
- Here, your customer or client will receive an email with a link inside to access the invoice.
- Clients will now open the email; they need to select “View Invoice now.”
- Look for the Pay Now button and then tap on it, within the invoice.
- Lastly, you need to proceed by typing the important credit card or bank account details. After the payment is completed, you and your client will receive a confirmation email for the transaction.
- If you wish to send the invoice via personal email or use it later for any purpose, save the invoice as PDF in the local drive.
- Click on the Print drop-down button and then click save as pdf.
- In case you are not able to save the invoice as a PDF, follow these troubleshooting steps to quickly resolve QuickBooks missing PDF component error.
Your Invoice in QuickBooks will be updated and then it will show the payment status as paid after the upgrade.
How to Add the Pay Now button to the Emailed Invoice?
If you also want to know the steps for adding a pay now button to the emailed invoice, follow the steps mentioned below but before that, you need to edit the online payment option for your company:
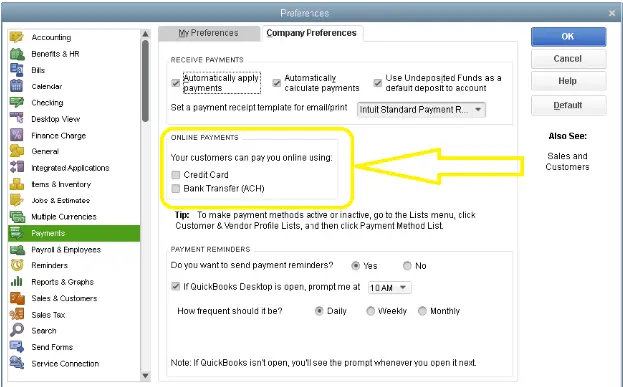
- To begin with, you need to select Preferences from the Edit option and then tap on Payments.
- After that, visit the Company Preferences tab.
- Now, verify the methods you would want to enable under the Online Payments section and then click on OK.
- In case you want to apply the alterations to existing customers then choose Apply to Existing Customers.
Note: If you wish to send a payment-enabled invoice, then proceed with the following steps below:
- First, you have to make an invoice and then enter all the important details.
- Then, ensure that in the Online payment option, the payment option is enabled.
- Finally, click on send but before that review the invoice.
Working with existing invoices might cause trouble with payment links in QuickBooks desktop. Unlike QuickBooks online in the desktop version, changes made are not real-time. We recommend deleting the older invoice and creating a new invoice after setting up merchant account settings and online payment settings in the QuickBooks. Read this article carefully before deleting an invoice in QuickBooks.
How can I add a payment link to the PDF version of an invoice?
Sending an invoice to the customer via email is a great feature. Quickbooks attaches the pdf version of the invoice by default, if enabled in the preferences.
However, we need to perform additional steps in case we need to include the payment link in the attached pdf invoice.
Before we get started, make sure you’ve copied the payment link for a particular invoice.
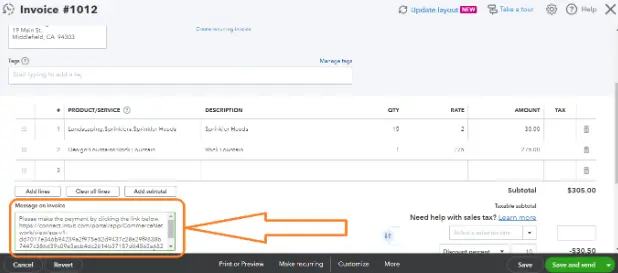
Step 1. Create an invoice or open the existing invoice you need to send.
Step 2. Scroll down and find the text box with the title “Message on Invoice.”
Step 3. Paste the payment link you copied earlier in this text box.
Step 4. Save the invoice as a pdf and send it to the customer.
Now, the sent pdf attachment included in the invoice will have the link to make the payment online.
What To Do in Case of the Missing QuickBooks Pay Now Button?
Generally, what happens is you can include the Pay Now button or payment link by accessing the review and Pay button during the invoice preview. Nevertheless, as a part of the security updates, QuickBooks has made some changes to its online invoice layout. You just need to download the invoice in the very beginning, so that you can see the preview.
But there are times when the payment link disappears or is not available because of Email Preferences, which is set to Plain text. If you want the payment link then you can go to your accounts and settings. After that, you can verify if any kind of changes are there in the sales preferences or not.
Below are the steps given to find the missing QuickBooks Pay Now button:
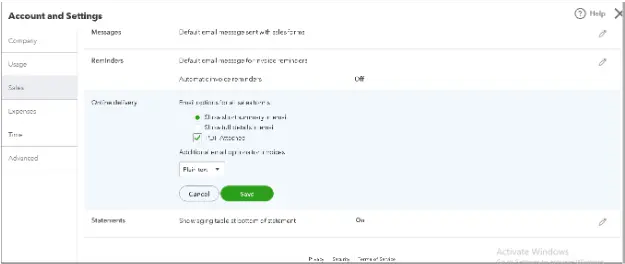
- To initiate the process, open QuickBooks and then tap on the Gear icon located at the top.
- After that, you need to tap on Account and Settings and then search for the sales menu, and tap on it.
- Then, you need to open the Online Delivery option.
- Now, for the invoice drop-down menu, select the Additional email options.
- Further, tap on the Online Invoice option.
- Then, end the process by clicking on Save and then done.
What is the Method to Send Online Invoices to QuickBooks Desktop?
Your clients have the convenience of making payments directly into your account through credit card or ACH transactions just by choosing the Pay Now button in the email if your QuickBooks payments feature is enabled.
If you configure online invoices then it will help you prompt payment directly to your account, and to achieve this, you are required to log in to your QuickBooks payments. In case you don’t have a QuickBooks account, then you can follow the steps given below:
Step No. 1: Connect to QuickBooks payments
Through this step, you will be able to receive the email you want. You can simply connect to the payments if you already have an account in it. Or else, sign in to the QB payments. Here’s how:
- To start with, you need to go to the settings and then tap on payments.
- After that, choose Connect QuickBooks Payments. (It gets turned on automatically if you are connected to a QB Online account already).
- At the end of the process, you will receive an email that you connected right now.
Step No. 2: Turn on the payment option
By turning on the payment option, customers will be able to pay online. You just have to follow the steps below:
- At first, look for the edit tab and then click on it.
- Now, from the drop-down menu tap on preferences.
- After that, tap on both the payments and company preferences tab.
- Then, you need to choose the payment option. Then from the Online customer section, you can make this available to every customer.
- In the end, you need to choose Apply to existing customers.
Step No. 3: Default settings for the invoices
If you want to choose some particular customers then you can follow the provided steps below:
- In the very first step, you need to search the customer menu and click on it, then choose Customers Center.
- Now, look for the customers you want to choose for the particular payment via the payment link option.
- In case you wish to change their profile, then you can go for the edit option. If you don’t want the changes, you can directly go to the payment settings and click on it.
- After that, you need to choose the payment option to make it available for the specific customer or client. End the process by clicking on OK.
Step No. 4: Send online invoices to customers
Here’s how you can send online invoices to customers:
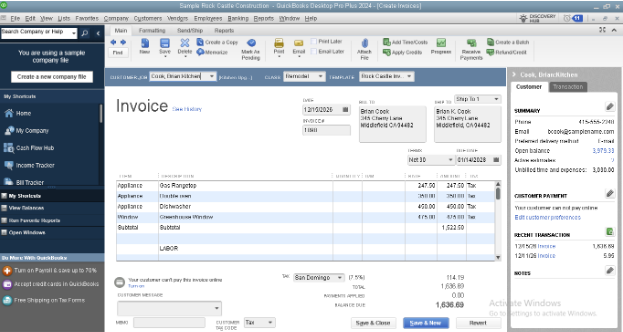
- To begin with the process, you need to go to the customer menu and create invoices.
- After that, click on the job from the customer menu. Select the customers but keep in mind that only the customer’s email ID should be given in the email ID field.
- Then, click on the payment option and choose Your customer can pay online.
- Now, you can edit the payment option for the invoice if you want to and then choose the change link and checkmark the boxes for payment options.
- Further, tap on save.
- You need to add the products and services that you wish to sell.
- Then, fill in every payment detail required in the invoice.
- Choose the main tab from the top of the invoice form.
- Here in this step, you need to choose the invoice you wish to send from the email drop-down.
- Finally, finalize the invoice text and tap on send.
The email which is sent to the customer has a Pay Now button, which the customers can use for online payment.
Wrapping up!
We have mentioned everything related to payment links in QuickBooks Desktop, like how you can add payment link to QuickBooks Desktop Invoice, how to send the invoice online, etc. If you still have questions regarding it, you can freely call our certified QuickBooks professional on the toll-free number +1(805)-419-9019. They will clear all your doubts and help you with technical assistance.