It looks like someone has bought a new computer and wants to transfer QuickBooks data to a new computer but is also worried about how to do it.
In that case, you don’t have to worry about anything, your valuable company files and financial data are in safe hands now. Bid your old computer goodbye and transfer your QuickBooks data to a new computer smoothly.
Through this article, you will be able to learn everything about the transferring process as the steps are easy to understand. After this, you can continue handling your finances and data without any interruptions.
Do not miss any of the points and follow the steps appropriately, or you might end up losing all your important data. The steps are easy but not as easy as it seems. If possible, take some QuickBooks expert’s advice.
Few Things to Perform Before Transferring the QuickBooks Company File
If you want to eliminate the risk of losing your important data file then read the list of a few necessary conditions:
- Do not change the version of your QuickBooks desktop, install the same version for your new computer too.
- Get the latest Windows update to ensure compatibility with Quickbooks desktop application.
- Edit the names of the company file from your old computer only, to ignore transferring of wrong files.
- Create a backup of all your important company files and data.
- Go to your old computer and transfer your QB license and registration information to the new one.
- If you are a payroll user then ensure that you upgrade your payroll tax tables.
To Transfer QuickBooks data to a new computer, you need to be very careful about it. It should be done smoothly to prevent it from any loss of essential files. Every procedure has some different steps to follow, so be more careful about it.
Steps to Transfer QuickBooks Data to a New Computer
Transferring QuickBooks Data to a new computer can be a task. In this process, you need to move your QuickBooks files to your new or some other computer. And without any QB expert’s advice, you might end up losing your QuickBooks data.
Nonetheless, we provided some procedures through which it will become easy for you to transfer QB data to a new computer. Here are the steps are given below for the transferring process, follow them carefully.
Step No. 1: Use Intuit Data Protect (IDP) to restore QuickBooks Data
This process can be a very easy task to perform if the plan of your Intuit Data Protect supports total backup of your personal computer. Only then you can use IDP to transfer your entire data into a new computer. Here’s how:
- First of all, go to your old computer and then create a complete backup of QB Data.
- After that, save the backup file safely to the online backup by signing in to your IDP account.
- Finally, by signing in to your IDP account you can restore the backup data in your new computer.
Note: If you are transferring your QB files using the Intuit data protect tool then you should know what files will get restored and transferred.
If you already know then move forward to the next step, if not then look below:
| Files that get transferred to the QuickBooks Data folder | Some additional files from another location |
| Logos and image files | Spell checker |
| Loan manager (.imr) files | Fixed Asset Manager |
| Transaction log (.tlg) files | QuickBooks letters and templates |
| Business Planner (.bpw) files [Only in QB Desktop enterprise and premier] | QuickBooks Statement Writer [Only in Premier Enterprise and accountant] |
| Network Data (.nd) files | Printer setting [These files can be recreated by QuickBooks] |
| Cash Flow Projector (.cfp) files |
Step No. 2: Create a backup and restore it on the new computer
This step can be easily executed by any layman who has no idea about QuickBooks. Follow the steps given below:
- Initially, go to your new computer and download the QuickBooks application Your QuickBooks product license won’t get hampered, execute the steps freely.
- If you are using your QB application in multi-user mode then switch it to single-user mode.
- After that, create a backup copy of your company file and save it with a different name to identify it easily while restoring. [save the file where you don’t struggle to find it].
- Now, insert a USB drive or any other hard drive in your old computer, in which you can copy your company file backup data.
- Further, insert the same USB flash drive or any other hard drive in your new computer.
- Double-click on the QuickBooks application. Go to the file menu and from there click on the open or restore company file option in order to restore the backup.
Note: If in case you are using payroll, then download the most recent tax tables on your QuickBooks application [Mandatory].
Step No. 3: Use the same computer to transfer the QuickBooks Data to another location.
- To begin with, create a backup copy of your company file.
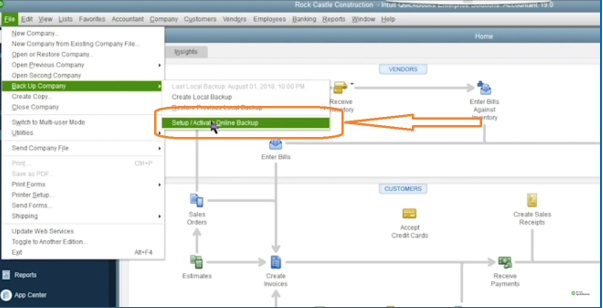
- Open QuickBooks, click on the file menu, and from there change from multi-user mode to single-user. After that, from the same option, select backup company.
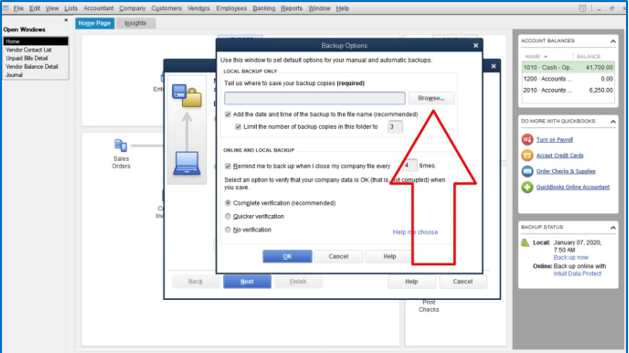
- Then, click on Create Local Backup in another window and tap on Next.
- Further, search for some accessible location to save your backup data after the local backup section has shown up on the screen.
Note: You can use the QuickBooks automatic backup to eliminate future tension. Just set it on a schedule, click on save it now, and also schedule a future backup option.
- Save your backup data with some particular name to identify it easily.
- Now make sure that your computer is hosted on a network. Then instead of saving on any network, save the file on some local hard drive.
- You need to follow the instructions provided to restore the backup to a new location or folder.
- Now that the backup has been restored. Utilize your new file as the primary company file.
- Lastly, rename the older company file by adding .old [For example, XYZ.old, ABC.old]. This will safeguard your data.
Step No. 4: Transfer the entire QuickBooks data to another system
You can learn different ways to transfer QuickBooks data to a new computer. One of the ways is to copy QB to some other system. Here’s how you can do it:
- First, go to the QuickBooks application and double-click on it.
- After that, you need to verify the location of the QB data folder. For that hold the Ctrl + L keys together on your keyboard.
- Now, go to the Windows file manager and open it. Here, search for the location where each QuickBooks data is stored.
- Further, select the folder, and copy it by simultaneously holding Ctrl + C.
- Then, paste [Ctrl + V] it into your USB flash drive or any hard drive.
- Insert your hard drive into the new computer.
- Copy the QuickBooks folder from there and paste it into your desktop.
- Finally, reopen QuickBooks, and go to the company file from your fresh folder.
Step No. 5: Set up and utilize the Migrator Tool in the QuickBooks application
If none of the above steps helped you in transferring QuickBooks data to a new computer, then you can use the Migrator tool of QuickBooks.
But do not use it in multi-user mode or even on the network, you might end up losing all your company file data
The migrator tool will help you in transferring three other company files to your very new and fresh computer. Proceed with the steps given below:
[On the Old Computer]
- To start with, go to Intuit’s official website and install the Migrator tool, then paste it into your USB drive.
- Now, insert your USB drive into your old computer. After that, go to the QB application
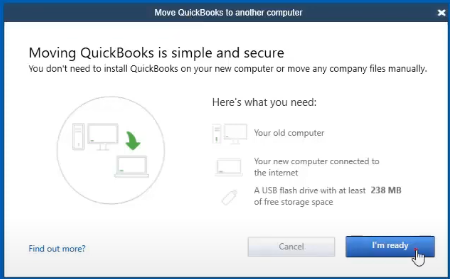
- From there, click on the files menu and then choose Utilities. From the drop-down menu, click on Move QuickBooks to another system.
- You will see two options on the screen, “cancel”, and “I’m ready”, tap on I’m Ready.
- After that, a box will appear on the screen, click on it and create a unique password to safeguard your company file.
- It will only be a one-time password, you will need it every time you insert your USB drive in the system.
- Further, follow the instructions that popped up on the screen, carefully.
- The process will take time to complete according to the size of your company file.
[On the new computer]
- In this step, insert your USB drive as the migrator tool finds it difficult to run individually as Windows security protocol won’t allow it.
- Open your USB drive, look for the move_QuickBooks.bat file record, and run it, to start the Migrator tool.
- Here, in the box, type that one-time password that you set earlier. You need to wait until the process gets completed.
- The migrator tool will be removed automatically when the process is completed.
- Rename the files from your old system. After that, go to the help menu and choose register QuickBooks.
In the end, type every single detail asked on the screen [For example, contact number, license key, postal code, etc.] to complete the registration.
| Things that don’t get copied through the Migratory Tool |
| If you haven’t opened any company files recently, then it won’t get copied. |
| When you create a backup manually it doesn’t get copied. |
| Configuration of multi-user set |
| When you install Intuit Data Protect on the old PC, then it might not get copied. |
| As IDP policy says, payment services or payroll setup in QB can’t be copied |
Conclusion
We hope that with the help of this article, you were able to transfer QuickBooks data to a new computer. We tried to provide you with each and every technique possible.
There are chances of you finding some issues while executing the steps, if this is the case then immediately connect with our certified experts through our Toll-free number +1(805)-419-9019 to avoid any further complications. You will get all your answers.